


CHP. 17 SAVING, RENDERING, AND PRINTING PROJECTS
319
Using nondistributed network rendering
1.
Save your project.
Note:
In order to use network rendering with nested
projects, the nested project must contain only media from
folders that do not require remapping. Before nesting your
Vegas project, update the project so that all media in the
project is added from a network folder or a local, shared folder
that is mapped to the same drive letter on all renderers and the
render host.
Your original project does not need to be saved in a shared folder. Before network rendering begins, a copy
of your project will be saved in the shared output folder (see step 4) for use by the renderers. This version
will have all media paths remapped based on the Network Render Service file mappings. For more
information, see Setting file mappings on page 321.
After rendering begins, you can continue to make edits to your original project without disrupting in-
progress network render tasks.
2.
If you want to render only a portion of your project, create a time selection that includes the portion you
want to render.
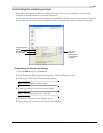
3.
From the File menu, choose Render As.
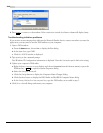
4.
Use the Render As dialog to choose the file format and location where you want to save your file. The
location of the output file must be in a shared folder.
5.
Select the Render loop region only check box in the Render As dialog if you want to render the selected
portion of your project.
6.
Select the Render using networked computers check box in the Render As dialog, and then click the Save
button. The Network Render dialog is displayed.
7.
From the Render Host drop-down list, choose the URL of the renderer you want to use to render your
project.
8.
The Temporary Files Location box displays the path to the folder where the temporary .veg project will be
saved. If you want to use a folder other than the output folder you choose in step 4, you can choose a
folder from the drop-down list or click the
Browse button to choose a folder.
This folder must be in a shared location.
9.
Click OK to start rendering.
10.
To add a project to the queue, open the project and repeat steps 1 through 8.
You can choose a different renderer for each project or time selection if you want to render the files
concurrently on separate computers. If you choose the same renderer, the rendering jobs will be queued to
run sequentially on that computer.