


324
SAVING, RENDERING, AND PRINTING PROJECTS CHP. 17
4.
Click Next. The Leader and Trailer dialog displays.
5.
Use the Leader and Trailer dialog to set up the data that will be printed before and after your project:
a.
From the Leader test pattern style drop-down list, choose a test pattern type and video format.
b.
Type a value in the Test pattern duration box to determine the length of the test pattern. To print
without a test pattern, enter 0.
c.
Select the Play 1 kHz tone with test pattern check box to add an audio test tone that will play along with
the test pattern.
d.
Type values in the Leader black duration and Trailer black duration boxes to set the length of blank space
that will be printed before and after your video. To print without a leader or trailer, enter 0 in the
appropriate box.
6.
Click Next. The Device Setup dialog appears. Choose the device control mode:
• Select Manual to cue the device manually and set it to record. Use this option if your IEEE-1394 DV
device is not OHCI-compliant or if the application is unable to obtain device control of your DV
recorder.
• Select Crash Recording to cue the device automatically based on a timecode value. Enter the timecode
where recording should begin in the
Device timecode box. The device must support OHCI 1394-DV
device control to use this option.
7.
Click Finish. If you have not already prerendered, portions of your project that cannot be rendered and
printed to tape in real time will be selectively prerendered. The selected video begins printing to the
device. A progress meter appears indicating the percent completed.
a.
If you’re using Manual mode, a dialog will be displayed after rendering is finished. You can specify a
delay time in the
Delay playback countdown timer box and select the Beep each second during countdown
check box if you want to count down before sending video to your device.
b.
If you’re using Crash Recording mode, your DV recorder will start and begin recording after rendering is
finished.
Printing to a tape deck connected to a DeckLink card
This feature is available only in the full version of Vegas software.
1.
Establish a connection to the capture card:
a.
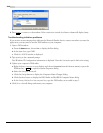
From the Options menu, choose Preferences. The Preferences dialog appears.
b.
Click the Print Device tab.
c.
From the Device drop-down list, choose Blackmagic Design DeckLink.
d.
Click OK. The Preferences dialog closes.
2.
To print just a portion of your project, make a time selection in the timeline.