


166
USING AUTOMATION CHP. 7
Cutting, copying, and pasting envelope points
1.
Select the Envelope Edit Tool button ( ).
2.
Click within a track to select it.
3.
Drag along the timeline to select envelope points.
4.
From the Edit menu, choose Cut or Copy.
5.
Click to position the cursor where you want to paste envelope points. Click within a different track if you
want to paste envelope points to another track.
6.
From the Edit menu, choose Paste. The envelope points are pasted in the new position.
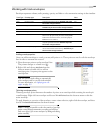
Copying an envelope to another track
1.
Select the Envelope Edit Tool button ( ). The Envelope Edit tool is active.
2.
Click within a track to select it.
3.
From the Edit menu, choose Select All.
4.
From the Edit menu, choose Copy.
5.
Click within a track to select it.
6.
Click Go to Start ( ) if you want the envelope to appear exactly as it was in the original track, or click to
position the cursor where you want the envelope to start.
7.
From the Edit menu, choose Paste. The envelope is pasted on the track.
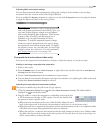
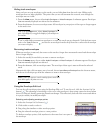
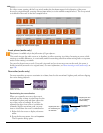
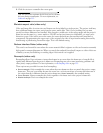
Locking envelopes to events
Track envelopes extend for the length of a track and are independent of the events on the track. This means
that the envelope remains in place when you move the events in the track. However, track envelopes can be
set to move with the underlying events, thus preserving the timing of envelope points in relation to events.
To lock all of the envelopes in a project to the events in which they occur, click the Lock Envelopes to Events
button ( ) or, from the Options menu, choose Lock Envelopes to Events. You can turn this feature off by
clicking the button again.
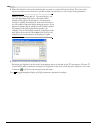
The original
...and the newly
pasted copy.
envelope...
The original event
Moving the event with
Lock Envelopes to Events
turned on
Moving the event with
Lock Envelopes to Events
turned off