


256
USING VIDEO FX, COMPOSITING, AND MASKS CHP. 14
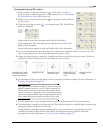
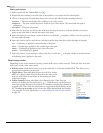
Changing editing options
Use the toolbar at the top of the Track Motion window to change your editing options.
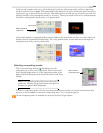
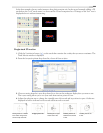
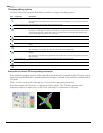
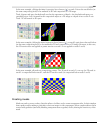
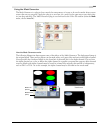
Examples of various 3D compositing scenarios
In the following examples, track two (blue-and-yellow checkerboard) is rotated forward in 3D space, track 4
(green-and-gray checkerboard) is rotated backward in 3D space, and track 3 (red-and-white checkerboard) is
a 2D track.
Track 1 is used to rotate tracks 2 through 4 so you can see the compositing interaction.
In the first example, the 2D track is a compositing child to track 2. The 2d child is inserted in the
composited output at a depth of zero on the Z axis, and tracks 2 and 4 intersect in 3D space.
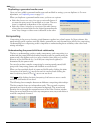
Icon Command Description
Enable Rotation Select this button if you want to be able to rotate, or spin, the video.
When the button is not selected, video is locked so you can move it along the X, Y, or Z axis, but the event will
not rotate.
Enable Snapping to Grid Select this button if you want your editing to snap to the grid.
Edit in Object Space Select this button if you want to edit in the object's space rather than the camera's space.
For example, if a video object is rotated, its X axis may not correspond to the X axis of the of the Video Preview
window. Selecting the Edit in Object Space button in conjunction with the Prevent Movement buttons allows
you to move the object along its own X, Y, and Z axes.
Prevent Movement (X) Select this button if you want to prevent horizontal movement of the track.
Prevent Movement (Y) Select this button if you want to prevent vertical movement of the track.
Prevent Movement (Z) Select this button if you want to prevent movement of the track along the Z axis (closer to or farther from the
viewer).
Lock Aspect Ratio Select this button if you want the selection box to retain its aspect ratio during resizing.
When the button is not selected, the height and width can be resized independently.
Scale About Center Select this button if you want the selection box to retain its center point when you resize the box by dragging
its edges.
When the button is not selected, the opposite side of the selection box will remain anchored when you drag the
edges to resize it.
Prevent Scaling (X) Select this button if you want to lock the horizontal dimension of the selection box.
Prevent Scaling (Y) Select this button if you want to lock the vertical dimension of the selection box.
Prevent Scaling (Z) Select this button if you want to lock the Z-axis dimension of the selection box.