


168
USING AUTOMATION CHP. 7
4.
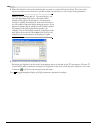
Click to position the cursor in the timeline, and click the Play button to start playback.
5.
Adjust the control that corresponds to the envelope point or keyframe you want to adjust.
During playback, adjusting a control will create envelope points or keyframes at the cursor position. As
long as you're adjusting the control, new envelope points/keyframes will be created for each change of the
play cursor's position.
6.
Click Stop to end playback and stop recording automation.
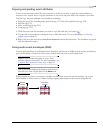
Editing sections of your recorded settings in Touch mode
In Touch recording mode, envelope points or keyframes are created only while a control is being adjusted.
When you stop adjusting the control, automation recording stops and the existing envelope points/
keyframes are unaffected.
Use Touch mode for touching up sections of your recorded automation settings.
1.
Click the Automation Settings button in the track header and select Show Automation Controls.
2.
Click the Automation Settings button and choose Automation Write (Touch) from the menu. The icon in
the track header is displayed as a
.
3.
Click to position the cursor in the timeline, and click the
Play
button to start playback.
4.
When you're ready to start editing, adjust the control that corresponds to the envelope point or keyframe
you want to adjust. Envelope points/keyframes are updated at the cursor position, and when you stop
adjusting the control, the original settings are preserved.
5.
Click
Stop
to end playback and stop recording automation.
Overwriting recorded settings in Latch mode
In Latch mode, envelope points or keyframes are created when you change a control setting, and recording
continues until you stop playback. When you stop adjusting the control, the control's current setting
overwrites the existing envelope points/keyframes.
Use Latch mode to overwrite automation settings with new values.
1.
Click the Automation Settings button in the track header and select Show Automation Controls.
2.
Click the Automation Settings button and choose Automation Write (Latch) from the menu. The icon in
the track header is displayed as a
.
3.
Click to position the cursor in the timeline, and click the
Play
button to start playback.
4.
When you're ready to start editing, adjust the control that corresponds to the envelope point or keyframe
you want to adjust.
Envelope points/keyframes are updated at the cursor position until you stop playback.
5.
Click
Stop
to end playback and stop recording automation.