


CHP. 17 SAVING, RENDERING, AND PRINTING PROJECTS
325
3.
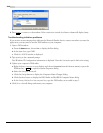
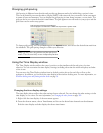
From the Tools menu, choose Print Video to Tape. The Conform Timeline to Device Format dialog
displays. Complete the following information:
•In the Templa te drop-down list, choose the appropriate template for rendering your video or click
Custom to select custom settings. For more information, see Customizing the rendering process on page 311.
Notes:
If you are working with a 24p progressive-scan
project or you have the
Allow pulldown removal when opening
24p DV
check box selected on the General tab of the
Preferences dialog, you will need to insert pulldown by
choosing the appropriate 24p DV template from the list.To
use the video footage later, choose the
NTSC DV 24p (inserting
2-3-3-2 pulldown)
template.
If you are not working with a 24p progressive-scan project
and you cleared the
Allow pulldown removal when opening
24p DV
check box on the General tab of the Preferences
dialog, you can use any DV template.
• To print only the portion of your project you selected in step 2, select the Render loop region only check
box.
4.
Click Next. The Leader and Trailer dialog displays.
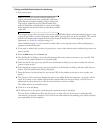
5.
Use the Leader and Trailer dialog to set up the data that will be printed before and after your project:
a.
From the Leader test pattern style drop-down list, choose a test pattern type and video format.
b.
Type a value in the Test pattern duration box to determine the length of the test pattern. To print
without a test pattern, enter 0.
c.
Select the Play 1 kHz tone with test pattern check box to add an audio test tone that will play along with
the test pattern.
d.
Type values in the Leader black duration and Trailer black duration boxes to set the length of blank space
that will be printed before and after your video. To print without a leader or trailer, enter 0 in the
appropriate box.
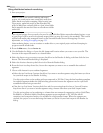
6.
Click Next. The Device Setup dialog appears. Choose the device control mode:
• Select Manual to cue the device manually and set it to record. Use this option if the application is unable
to obtain device control of your deck.
• Select Crash Recording to cue the device automatically based on a timecode value. Enter the timecode
where recording should begin in the
Device timecode box. The application must be able to perform basic
device control of your deck.
• Select Auto Edit if your deck supports Auto Edit/Insert Edit mode. Type timecode values in the Start
printing at
and End at boxes to indicate the exact frames you want to record (much like punch-in audio
recording). When you click
Finish, recording will begin and end automatically at the specified timecode
positions.
Note:
When using Auto Edit mode, use a striped tape to
ensure continuous timecode over the portion of the tape where
you plan to record.
Select the Preview only check box if you want to preview the your print-to-tape operation without
engaging the deck’s record head when you click
Finish.
Use Preview only mode to double-check and adjust your Start printing at and End at timecode settings as
needed.