


CHP. 6 WORKING WITH TRACKS
147
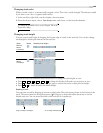
Assigning audio tracks to busses
If your project contains multiple busses, you can assign a track to a specific bus.
This feature is available only in the full version of Vegas software.
1.
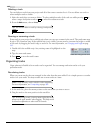
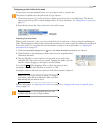
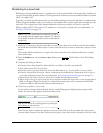
Click the Bus button ( ) in the track list to display a drop-down list of available busses. This button
appears only if the project contains multiple busses. For more information, see Adding busses to a project on
page 183.
2.
From the drop-down list, choose the bus for the track’s output.
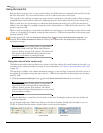
Adjusting bus send levels
When a track is routed to a bus, you can control the level of tracks sent to the bus using the multipurpose
slider. The multipurpose slider in the track header can function as a trim control that adjusts the overall send
level of the track, or it can adjust bus send automation settings. For more information, see Adjusting bus
automation levels on page 159.
1.
Click the Automation Settings button and verify Show Automation Controls is not selected.
2.
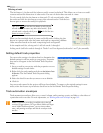
Click the label on the multipurpose slider and choose an assignable effects
chain from the menu.
3.
Drag the FX fader to control the level of the track sent to each of the
assignable FX chains that you have created. Dragging the fader to the left
cuts the volume; dragging to the right boosts the volume.
You can hold while dragging a fader to adjust the setting in finer
increments, or double-click the fader to return it to 0 dB.
If multiple tracks are selected, the trim level of all selected tracks is adjusted.
Note:
Bus sends are pre-volume by default. To change to
post-volume, right-click the multipurpose slider and choose
Post Volume from the shortcut menu.
For more information, see Adjusting a bus send level on page 186 or Assigning audio tracks to assignable effects
chains on page 188.
Note:
Multiple busses and assignable effects are only
available in the full version of Vegas software.
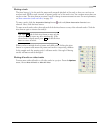
Select a bus
for playback
Ctrl