


84-6
Cisco Unified Communications Manager Administration Guide
OL-18611-01
Chapter 84 Cisco Voice Mail Port Wizard
Adding Ports to an Existing Cisco Voice-Mail Server
Next Steps
• Make sure that you set up the message-waiting indicator (MWI) device. For more information, refer
to the
“Cisco Unity and Cisco Unity Connection Configuration Checklist” section in the Cisco
Unified Communications Manager System Guide.
Additional Topics
See the “Related Topics” section on page 84-7.
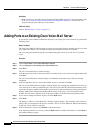
Adding Ports to an Existing Cisco Voice-Mail Server
To use the Cisco Voice Mail Port Wizard to add ports to an existing Cisco voice-mail server, perform the
following steps.
Before You Begin
The Cisco Voice Mail Port Wizard requires a range of consecutive directory numbers for the voice-mail
ports. Make sure that the voice-mail pilot number and subsequent numbers are available.
The voice-mail pilot number designates the number that people call to access the Cisco voice-mail
server.
Procedure
Step 1 Choose Voice Mail > Cisco Voice Mail Port Wizard.
Step 2 Choose Add ports to an existing Cisco Voice Mail server.
Step 3 Click Next.
The Cisco Voice Mail Server window displays.
Step 4 From the drop-down list box, choose the name of an existing Cisco voice-mail server (pilot number) and
click Next.
The Cisco Voice Mail Ports window displays and identifies the number of ports that are currently
configured.
Step 5 From the drop-down list box, choose the number of ports to add and click Next.
The Cisco Voice Mail Directory Numbers window displays the configuration information for the Cisco
voice-mail server to which you added the ports. The Cisco Voice Mail Port Wizard automatically selects
consecutive directory numbers following the last port and uses the same Partition, Calling Search Space,
Display, AAR Group, and External Number Mask settings as the Cisco voice-mail pilot directory
number. You can enter a different range of directory numbers in the New Directory Numbers field.
Step 6 If you need to change the number of ports, click the Back button.
Step 7 Click Next.
The Ready to Add Cisco Voice Mail Ports summary window displays. This summary window lists the
settings that you configured in the previous windows. The Cisco Voice Mail Port Wizard automatically
assigns the correct values for each port.
Step 8 If this information is correct, click Finish to add the new ports.
If the information shown is not correct, click the Back button to edit the information or click Cancel to
quit without adding any ports.