


9-8
User Guide for Resource Manager Essentials 4.1
OL-11714-01
Chapter 9 Making and Deploying Configuration Changes Using NetConfig
Starting a New NetConfig Job
(To reset the values that you have selected click Reset. Click Cancel to return to the previous dialog box,
without saving your changes.)
You will see the instance of the task in the Added Tasks pane of the Add Tasks dialog box. The instance
appears in this format:
Taskname_n, where Taskname is the name of the task you have added, and n is the number of the
instance. For example, the first instance of a Banner task is
Banner_1.
You can add as many instances as required, for a task.
Step 8 Click Next.
The Job Schedule and Options dialog box appears with these panes:
Step 9 Set the schedule for the job, in the Scheduling pane:
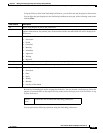
Pane Description
Scheduling
Allows you to schedule the job.
Job Options
Allows you to set the job options.
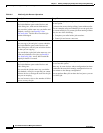
Field Description
Scheduling
Run Type Select the run type or frequency for the job—Immediate, Once, Daily, Weekly, Monthly,
or Last Day of Month.
If Job Approval is enabled, the Immediate option is not available.
Date Select the start date for the job.
at Select the start time for the job from the hour and minute drop-down lists.
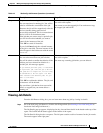
Job Info
Job Description Enter the Job Description. Make each description unique so you can easily identify jobs.
This is mandatory.
E-mail Enter e-mail addresses to which the job will send status notices. Separate multiple
addresses with commas or semicolons.
You must configure the SMTP server to send e-mails (Common Services > Server >
Admin > System Preferences).
If the user who has created the job has a valid e-mail address, an e-mail notification is
sent with the user’s address in the sender address field, when job is started and completed.
If the user who has created the job does not have a valid e-mail address, then the
notification e-mails will be sent with the sender address field blank.
Notification e-mails include a URL that displays the job details (see Viewing Job Details
for the more information about what details are displayed). If you are not logged in, you
must log in using the provided login panel to view the job details.
Comments Enter your comments for the job. Comments appear in job work order and are stored in
configuration archive.