


14-19
User Guide for Resource Manager Essentials 4.1
OL-11714-01
Chapter 14 Enabling and Tracking Syslogs Using Syslog Analyzer and Collector
Syslog Administrative Tasks
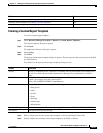
Note View the Permission Report (Common Services > Server > Reports) to check if you have the required
privileges to perform these tasks.
Setting the Backup Policy
The Backup Configuration feature allows you to save the Syslog messages to a flat file. The syslog data
that is trimmed from the database will be moved to the flat file.
Note In Solaris, the backup file is created with -rw-r----- casuser casusers irrespective of the permissions
given to the directory for backup on purge. In Windows, the backup file inherits the permission and
ownership of the directory it is created in, which is the directory selected as the backup location (on
purge).
View the Permission Report (Common Services > Server > Reports) to check if you have the required
privileges to perform this task.
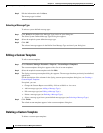
To set up the backup policy:
Step 1 Select Resource Manager Essentials > Admin > Syslog > Set Backup Policy.
The Backup Policy dialog box appears.
By default, the backup policy is set to disabled.
Step 2 Select Enable to enable the backup process for Syslog messages, after configuring backup.
Step 3 Click Browse to select the backup file location.
The Server Side File Browser dialog box appears.
In the Server Side File Browser dialog box:
a. Specify the external file.
b. Select Directory Content,
c. Click OK.
Step 4 Enter the maximum size that you want to set for the backup file. By default this is set to 100 MB.
Step 5 Enter the e-mail ID of the user who should receive a notification, if the backup fails. You can enter
multiple e-mail addresses separated with commas. This is a mandatory field.
Configure the SMTP server to send e-mails in the View/Edit System Preferences dialog box (Common
Services > Server > Admin > System Preferences).
We recommend that you configure the CiscoWorks E-mail ID in the View / Edit System Preferences
dialog box (Common Services > Server > Admin > System Preferences). When the job completes, an
e-mail is sent with the CiscoWorks E-mail ID as the sender's address.)
If you also want a notification to be sent when the backup is a success, select Also Notify on Success.
Step 6 Either click Save to save the backup configuration details that you have specified or click Reset to clear
the values that you specified and reset to the previously saved values in the dialog box.