


14-27
User Guide for Resource Manager Essentials 4.1
OL-11714-01
Chapter 14 Enabling and Tracking Syslogs Using Syslog Analyzer and Collector
Defining Custom Report Templates
Step 1 Select Resource Manager Essentials > Reports > Custom Report Templates.
The custom templates dialog box appears with a list of custom templates.
Step 2 Select the required custom template.
Step 3 Click Delete.
You will be asked to confirm the deletion. If you confirm the deletion, the template will be deleted.
The Syslog custom report template is deleted and no longer appears in the Syslog custom report template
dialog box.
Running a Custom Report
You can run any custom report that you previously created. Custom report templates that you created,
appear in the Report Generator drop-down list box for Syslog, with a separator.
To create a custom report template, see Defining Custom Report Templates.
To run a Syslog custom report:
Step 1 Select Resource Manager Essentials > Reports > Report Generator.
The RME Reports dialog box appears, in the Report Generator page.
Step 2 Go to the first drop-down list box, select Syslog.
Step 3 Go to the second drop-down list box, select the required custom report. (Custom reports that you created
appear in the drop-down list box with a separator).
The Device Selector appears, along with the fields that allow you to enter information in the Scheduling
and Job Info fields.
Step 4 Select the required devices using the Device Selector. (See the topic, Using RME Device Selector in the
section Adding and Troubleshooting Devices Using Device Management, for more details.)
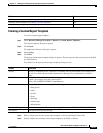
Step 5 Enter the information required to generate the required custom report, in the Date Range, Scheduling,
and Job Info groups:
Field Description
Date Range
24 Hours Select this option, only if you want to generate a 24 hour report. This report will contain all the
syslog data gathered during the last 24 hours. For example, if you select this option and schedule
the report to be generated at 6.p.m. the report will have the data of the past 24 hours, from 6 p.m.
From Click on the calendar icon and select the date. The date appears in the dd-mmm-yyyy format in
the From field. For example, 02-Dec-2004.
The From field is enabled only if you have de-selected the 24 Hours check box.
To Click on the calendar icon and select the date. The date appears in the dd-mmm-yyyy format in
the To field. For example, 03-Dec-2004.
The To field is enabled only if you have de-selected the 24 Hours check box.